What is a one-wire diagram?
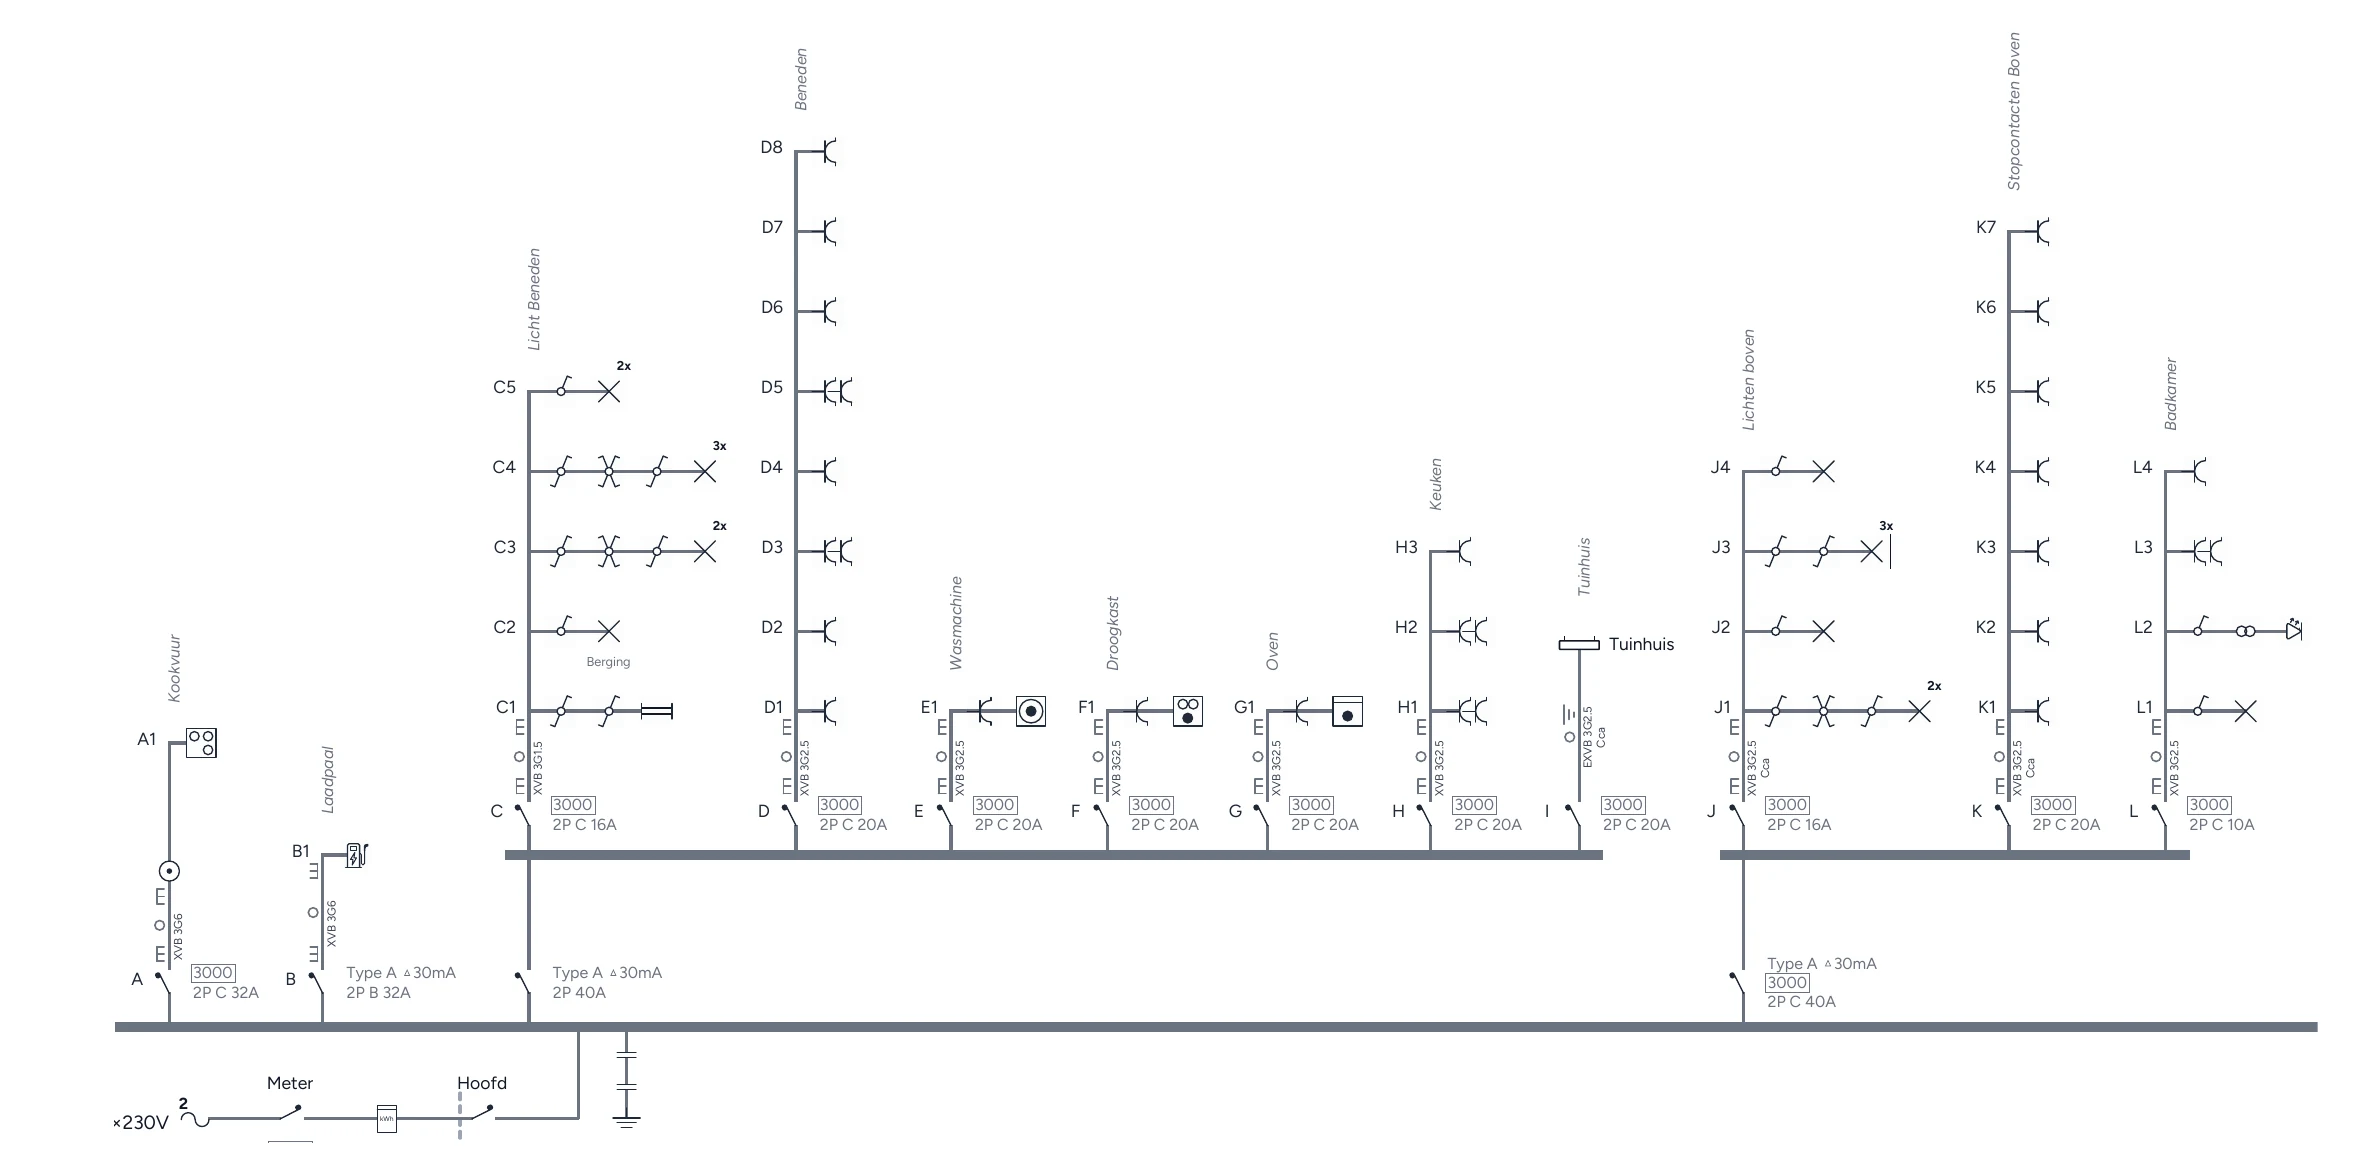
A one-wire diagram is the electrical diagram of an installation in which every circuit is drawn as a single line, however many conductors the cable really has. It shows how the installation is supplied and protected: from the connection, through residual current devices and circuit breakers, to every socket, light point and fixed appliance.
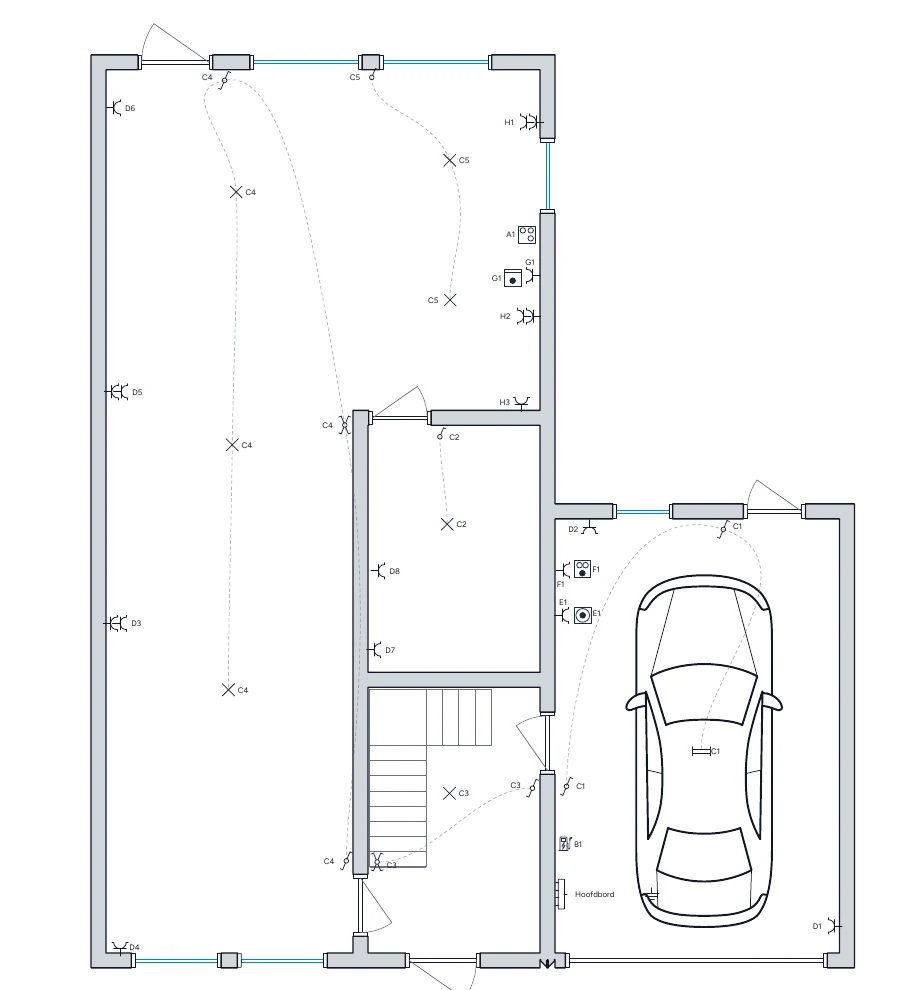
It belongs together with the situation plan. The one-wire diagram shows the electrical structure; the situation plan shows where everything is in the building. The same codes, such as A1, A2 and B1, link both documents.
When do you need one?
For a new domestic installation and for an important extension or modification, a one-wire diagram and a situation plan must be drawn up (AREI 3.1.2.1). In practice you need them for:
- the inspection of a new build or renovation;
- the sale of a home;
- a re-inspection after remarks;
- solar panels, an EV charger, a home battery or an extra sub-board;
- regularising an older installation.
Can you draw it yourself?
Yes. The diagram does not have to be drawn by an electrician. It must be correct and complete and match the real installation. The inspector compares the diagram with what they see in the board and in the home. More background is in the AREI guide.
What must be on a one-wire diagram?
The rule of thumb: from any socket or appliance, someone must be able to trace which cable, breaker and residual current device supplies it. Record at least the data in the table below, plus the installation address. The full list is in the AREI guide under documentation and inspection.
| Part | What you record | Example |
|---|
| Supply | Voltage and connection | 230 V or 400 V, meter |
|---|
| Residual current device | Sensitivity, rated current and type | 300 mA main RCD, 30 mA for the bathroom |
|---|
| Circuit breaker | Rated current and number of poles | 16 A or 20 A, 2-pole |
|---|
| Cable | Type, conductors and cross-section | XVB 3G2.5 or VOB 2.5 mm² in conduit |
|---|
| Circuit | Letter or name | Circuit A, circuit B |
|---|
| Points and appliances | Kind and code | Socket A1, light B3, hob D1 |
|---|
Example one-wire diagram
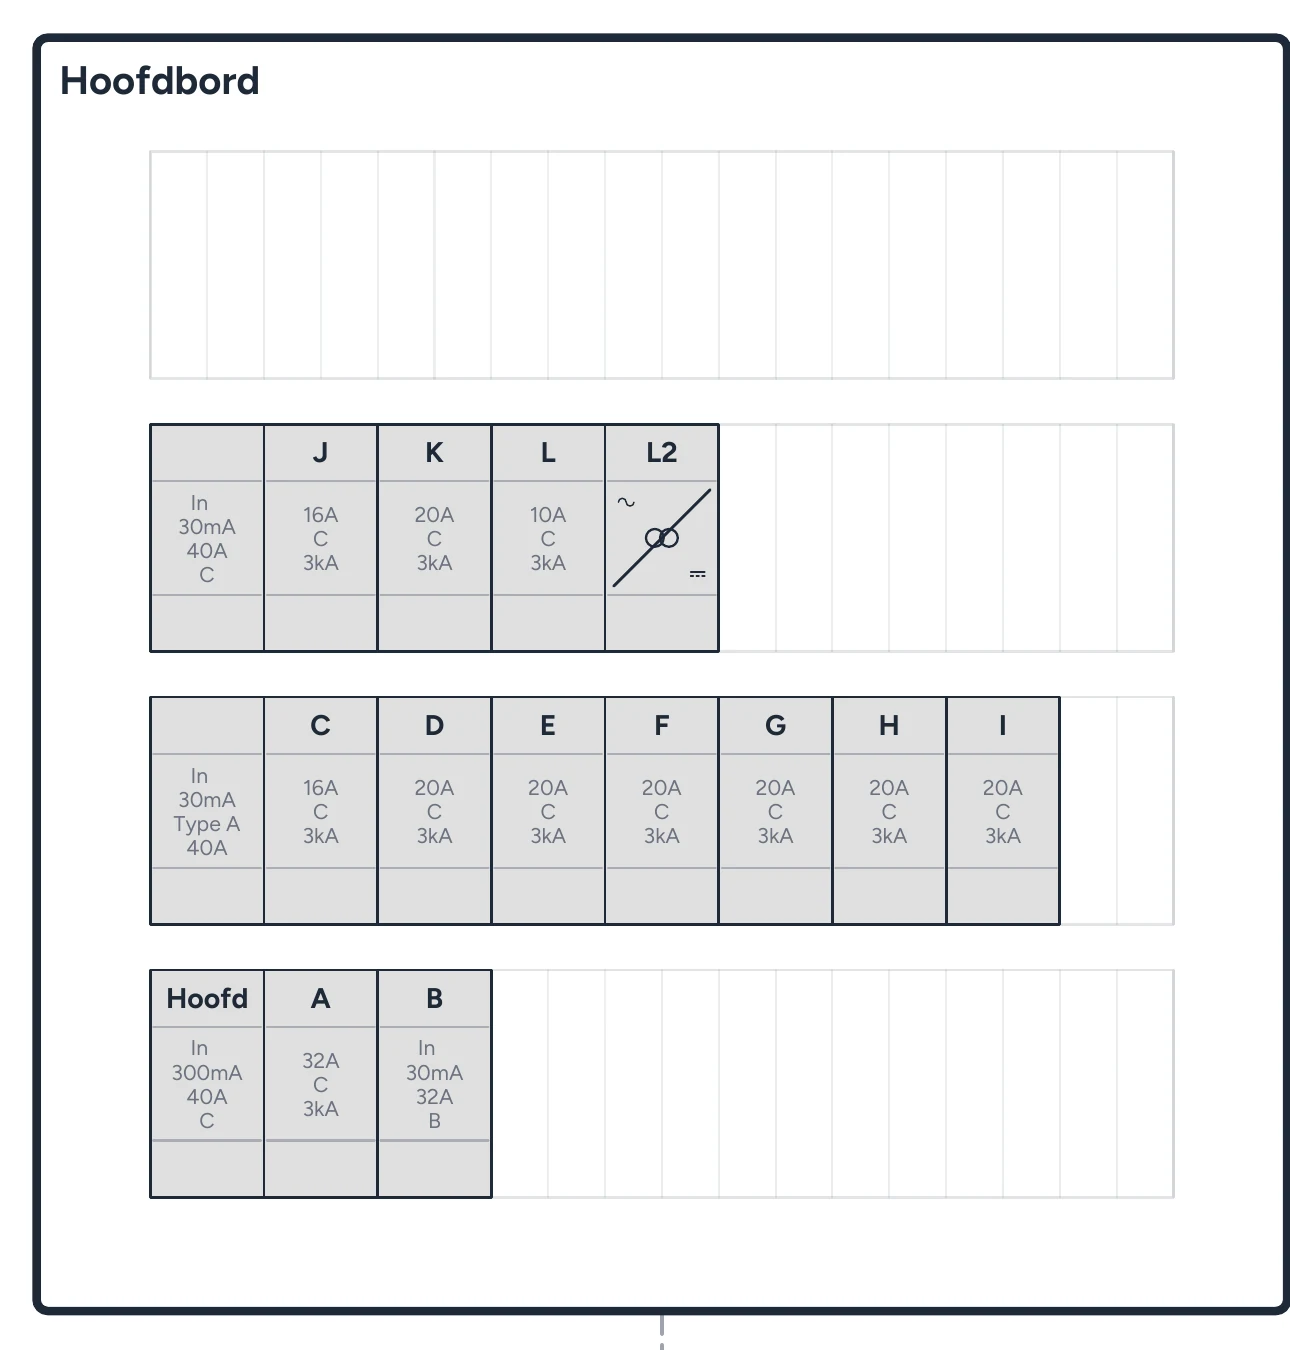
Download an example PDF of a fictional home with a main board and a garden shed. It contains the one-wire diagram, the situation plans per floor, the board layout and a circuit legend, as exported by Condui. The labels are in Dutch.
Step 1: Inventory your distribution board
Start at the board, not at the floor plan. Photograph every row of modules; you can check everything against the photos while drawing.
Then note for every breaker:
- the circuit letter or name;
- the breaker rating;
- which residual current device it sits behind (30 mA or 300 mA);
- the cable type and cross-section leaving it;
- which sockets, lights and appliances are on that circuit.
Step 2: Draw the structure from left to right
Draw the complete structure with all protection devices first. Only then add cables and points per circuit, so you don't have to rearrange everything halfway.
A one-wire diagram reads as a chain. Keep this order and even a complex board becomes manageable:
- connection or meter;
- main residual current device;
- distribution board and any sub-boards;
- residual current devices per group;
- breakers per circuit;
- cables;
- sockets, light points and fixed appliances.
Faster: redraw the board in Condui
In Condui you can start in the board view. You redraw the board module by module, and Condui builds the one-wire diagram from it. This works on a tablet or phone next to the board, so you can finish later on your computer.
Step 3: Add cables, points and codes
Give each circuit a letter and number its points: A1, A2, A3 for circuit A. Keep the numbering boring and consistent so someone who doesn't know the home can read it.
For every fixed appliance, such as a hob, oven, water heater or heat pump, note which circuit it is on. Solar panels, an EV charger or a home battery belong in the same diagram, not in a separate attachment.
Step 4: Link the situation plan
Place every point from the one-wire diagram on the situation plan with the same code. Devices mounted inside the board don't need to be on it. The floor plan doesn't have to be to scale, as long as the rooms and floors are clear.
Condui keeps the one-wire diagram and the situation plan synchronised in one project, so every point appears on both with the same code. You can also import an existing floor plan as PNG, JPG, PDF, DWG or DXF.
Step 5: Check and export
Review the diagram before printing. Does every breaker suit its cable cross-section? Is every point on a circuit? Do all codes appear on both documents?
Condui shows AREI points of attention while you draw, such as an unlikely combination of breaker and cable cross-section or missing installation data. A message tells you where to look; it never changes anything automatically. See AREI validation.
When everything checks out, export the one-wire diagram and situation plan as a PDF for the inspector.
Common mistakes
Inspectors keep seeing the same mistakes, some technical and some only on paper:
- a 20 A breaker on a 1.5 mm² cable;
- more sockets on one circuit than allowed;
- a mixed circuit of sockets and lights in 1.5 mm² instead of 2.5 mm²;
- a point on the situation plan that is missing from the one-wire diagram, or the reverse;
- a missing circuit letter or cable cross-section;
- a sub-board without a clear supply;
- a residual current device without type or sensitivity;
- an old diagram not updated after a renovation.
By hand, in a drawing program or in Condui?
A hand-drawn diagram can work in principle, but it is slow, hard to change and easy to copy wrongly. General drawing programs such as draw.io or a CAD package also work, but you have to find the AREI symbols yourself and nothing is checked.
Condui is built for Belgian one-wire diagrams: AREI symbols, a linked situation plan and feedback while you draw. Local projects are free and unlimited. Read what is free or compare one-wire diagram software.
Frequently asked questions
- Can I draw a one-wire diagram for free?
- Yes. In Condui you draw unlimited local projects on your device, including AREI checks. A free account also gives you one cloud project with all premium features except templates. Local PDF export carries a watermark. The pricing page explains when paying makes sense.
- Is a one-wire diagram the same as an eendraadschema?
- Yes. Eendraadschema is the Dutch term used in Flanders; in French it is a schéma unifilaire.
- What is the difference with a situation plan?
- The one-wire diagram shows the electrical structure: protection devices, cables and circuits. The situation plan shows on a floor plan where sockets, lights, switches and appliances are. Both use the same codes.
- Can I import an existing Trikker project?
- Yes. With a free account you can import a .trik file and convert your existing project to Condui. See the comparison with Trikker.
- Does Condui guarantee my installation will pass?
- No. Condui compares your diagram with AREI rules and points out possible mistakes sooner. The inspection also depends on the physical installation, which Condui cannot assess.